There is a specific kind of frustration every wig wearer knows too well. You’ve spent the better part of your afternoon prepping, gluing, cutting, and styling. You finally step back, check the mirror, and realize that harsh, unmistakable line right at your hairline. It’s the “wig line of shame.” Whether you’re experimenting with full lace human hair wigs or just trying to get a standard unit to sit right, that artificial, bulky look is the ultimate buzzkill. You want your hair to look like it’s growing straight out of your scalp, not like you’re wearing a hat made of hair.
Achieving that “melted” look isn’t about buying the most expensive hair on the market. It’s actually about the details—specifically, how the lace interacts with your skin tone. When the colors clash, the illusion fails. Here is how you can finally make that lace disappear and get the natural finish you’ve been chasing all along.

Getting the Foundation Right: Frontal vs. Full Lace
Before we fix the color, let’s clear the air on terminology. It can get confusing out there. A lot of people ask me, “what is a frontal wig?” It’s a fair question. Basically, a frontal wig features a piece of lace that covers the front hairline from ear to ear, giving you that natural-looking part, while the rest of the wig is made of machine-wefted tracks. It’s a great option for daily wear, and honestly, it’s a bit easier to manage for beginners.
But then there are full lace wigs. These are a different beast entirely. The entire base is lace, meaning every single strand of hair is hand-tied. This gives you total freedom—you can rock high ponytails, deep side parts, middle parts, you name it. Because you can part them anywhere, you have to be much more careful about matching your skin tone across your entire scalp, not just at the forehead. When the whole unit is lace, there’s nowhere to hide, so custom-tinting is absolutely non-negotiable.
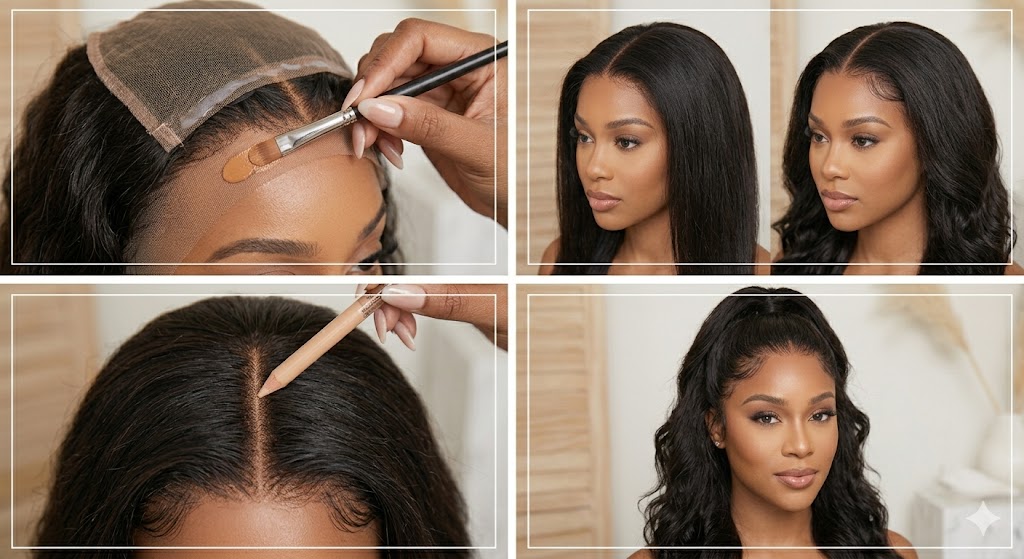
The Secret Start: Bleaching the Knots
If you skip this, you’re fighting an uphill battle. When wigs are manufactured, the hair is tied to the lace using tiny, dark knots. When you put that lace against your skin, those knots create a grid-like effect—it looks like a scalp full of dots. Bleaching these knots is the first step toward invisibility.
You’re essentially trying to lighten those dark knots to a soft, warm blonde or light brown so they blend with your scalp color. But here’s the warning: don’t overdo it. If you leave the bleach on too long, you’ll weaken the hair roots, which leads to shedding. Use a high-quality developer, watch the color change like a hawk, and wash it out immediately once the knots look right. Follow up with a neutralising shampoo. This one step transforms the lace from a “grid” to a “skin” texture.
Customizing the Tint: Making it Yours
Not every wig comes with lace that perfectly matches your complexion. That’s okay. In fact, most pros expect to tint the lace themselves. If the lace is too light, it looks chalky; if it’s too dark, it looks muddy.
Don’t paint the top of the lace—paint the underside. Why? Because that’s the part that actually touches your skin. If you use a lace tint spray or even a bit of fabric dye on the underside, you’re essentially staining the lace to match your skin’s undertone. If you’re in a rush, a little bit of powder foundation buffed into the underside of the lace works wonders. Just be sure to match the undertone—if you’re warm-toned, don’t use a cool-toned foundation, or you’ll get that weird, grey-cast look.

The Bald Cap Method: Your Canvas
You can have the best-tinted lace in the world, but if your braids underneath are bulky or the wrong color, the wig still won’t look right. You need a flat, neutral canvas.
Start by braiding your natural hair flat. If your braids are lumpy, the wig will sit lumpy. Next, use a stocking cap that matches your skin tone. Glue that cap down around your hairline, trim the excess, and then—here’s the trick—apply a little bit of makeup on the cap exactly where your part and hairline will be. By the time you lay your full lace human hair wigs over this cap, you aren’t just gluing lace to hair; you’re gluing it to a custom-colored surface that perfectly matches your skin.
The Reality Check: Is It Worth It?
Let’s be real about the pros and cons. Mastering this technique takes time. It’s not something you can rush on a Tuesday morning before work.
The upside is undeniable. When you get it right, the wig is practically invisible. You gain the confidence to pull your hair back, part it in the middle, or wear it however you want without worrying about someone spotting the lace. The downside? It’s a learning curve. Bleaching knots is intimidating the first time, and finding the perfect tinting technique takes some trial and error.
If you find yourself struggling with lifting, check your glue application. Often, we get impatient and apply the wig while the glue is still white. Let it get tacky—let it turn completely clear. If you rush the drying time, the lace won’t hold, and you’ll be doing touch-ups by the afternoon.
Refresh Your Look for the Season
Speaking of refreshing your style, the seasons are changing, and it’s the perfect excuse for an upgrade. If you’ve been holding off on buying a new, high-quality unit, keep an eye out for upcoming Mother’s Day sales. It’s the perfect time to treat yourself—or a loved one—to a luxury piece at a price that doesn’t hurt the bank account. A fresh, properly customised wig can change your entire mood, and it’s a wonderful gift for someone special or even just a little self-love for yourself.

Wrapping It Up
At the end of the day, blending your lace is an art form. It’s not just about slapping a unit on your head and calling it a day. It’s about the prep, the patience, and the small tweaks that turn a store-bought wig into something that looks like it’s genuinely yours. Don’t get discouraged if your first attempt isn’t perfect. It takes practice to get that hairline just right.
Take your time with the bleaching, be gentle with the tinting, and don’t rush your glue application. When you put in that extra effort, the result isn’t just a wig—it’s a flawless look that you can wear with total confidence. Once you finally master that invisible finish, you’ll realise it was worth every extra minute of prep. Keep experimenting, keep practising, and you’ll be rocking a flawless hairline in no time.