A flawless exterior paint job does not begin with a brush, it begins long before the first coat touches the wall. The difference between a finish that fades within a year and one that lasts for a decade often lies in preparation. Yet, this is exactly where most homeowners, and even some contractors, cut corners.
If you want durability, aesthetic appeal, and long-term protection, preparation is not optional. It is the foundation. Below is a comprehensive checklist that highlights the commonly overlooked steps that make or break an exterior painting project.
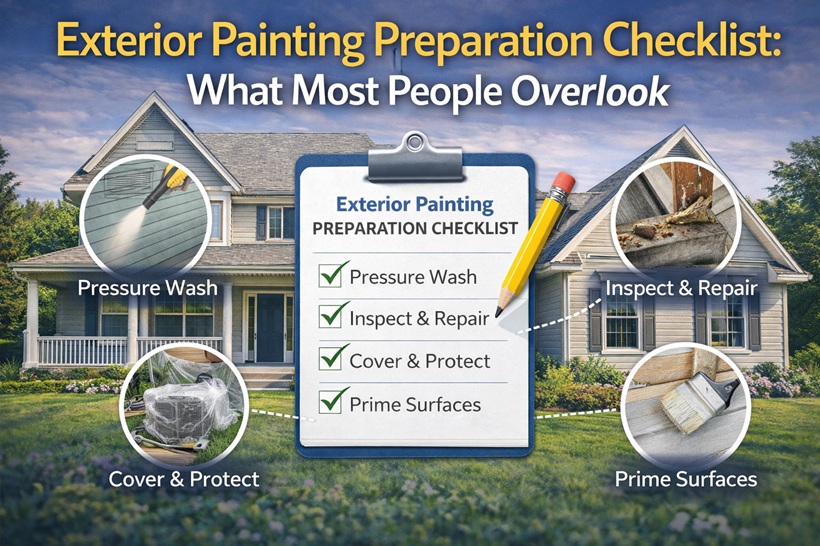
- Thorough Surface Inspection: More Than a Quick Look
Before any prep work begins, a detailed inspection is critical. This step goes beyond identifying peeling paint.
Check for:
- Hairline cracks in siding or stucco.
- Moisture damage or mold growth.
- Wood rot, especially around trims and windows.
- Nail pops or loose boards.
Ignoring these issues means sealing problems beneath fresh paint, leading to premature failure. A professional exterior painting company in Medford will always begin with a structural and surface evaluation to avoid costly rework.
- Power Washing: Not Just About Cleaning
Many people assume washing is only about removing dirt. In reality, it ensures proper paint adhesion.
Key considerations:
- Remove mildew, chalky residue, and pollutants.
- Use appropriate pressure to avoid surface damage.
- Allow sufficient drying time (24–48 hours minimum).
Painting over a damp or dirty surface traps contaminant, leading to bubbling and peeling. This is one of the most overlooked yet critical steps.
- Scraping and Sanding: The Detail Work That Matters
Loose and flaking paint must be removed completely. Skipping this step results in uneven finishes and poor bonding.
Focus on:
- Scraping all peeling layers.
- Feather sanding edges for a smooth transition.
- Using fine-grit sandpaper for finishing.
Professional painters in Cherry Hill emphasize this stage because it directly impacts the final look and longevity of the paint job.
- Repairing and Filling Imperfections
Painting over cracks and holes does not hide them, it highlights them.
Essential repairs include:
- Filling gaps with exterior-grade caulk.
- Replacing damaged wood or siding.
- Patching holes with durable fillers.
This step ensures a seamless surface, allowing the paint to enhance rather than expose flaws.
- Priming: The Unsung Hero
Primer is often skipped to save time or money, but this shortcut leads to long-term issues.
Why primer matters:
- Improves paint adhesion.
- Blocks stains and discoloration.
- Provides uniform color coverage.
Different surfaces require different primers – wood, metal, and masonry each demand specific formulations. A professional approach ensures the right match.
- Protecting Surrounding Areas
Preparation is not just about the walls, it’s also about protecting everything around them.
Do not overlook:
- Covering plants, furniture, and walkways.
- Masking windows, doors, and trims.
- Securing fixtures like lights and mailboxes.
Neglecting this step can lead to unnecessary damage and clean-up costs.
- Weather Assessment: Timing Is Everything
Even the best preparation fails if weather conditions are ignored.
Ideal conditions include:
- Mild temperatures (10°C–30°C).
- Low humidity.
- No rain forecast for at least 48 hours.
Painting in unsuitable weather affects drying, adhesion, and finish quality. Planning ahead ensures optimal results.
- Choosing the Right Tools and Materials
Not all paints and tools are created equal. Using substandard materials compromises the entire project.
Key factors:
- High-quality exterior paint with UV resistance.
- Brushes and rollers suited for surface type.
- Proper ladders and safety equipment.
Professionals invest in quality tools because they understand the long-term value they deliver.
- Addressing Hidden Moisture Issues
One of the most overlooked factors is moisture infiltration.
Watch for:
- Water stains or damp patches.
- Poor drainage around the property.
- Faulty gutters and downspouts.
Painting over moisture-prone areas without fixing the root cause leads to blistering and paint failure.
- Final Walkthrough Before Painting
Before opening the paint can, conduct a final review.
Checklist:
- Surfaces are clean and dry.
- Repairs are complete.
- Primer is applied where needed.
- Surroundings are protected.
This step ensures nothing is missed and sets the stage for a professional-grade finish.
Conclusion
Exterior painting is as much a science as it is an art. While color selection often gets the spotlight, preparation does the heavy lifting behind the scenes. Skipping even one step can compromise durability, aesthetics, and overall value.
Whether you are hiring an exterior painting company in Medford or working with experienced painters in Cherry Hill, understanding this checklist empowers you to demand quality and avoid common pitfalls.
Because in exterior painting, what you don’t see before the first stroke is what determines how long the beauty lasts after.